 Instock - fast delivery
 Low-cost delivery all over Europe
 Expert guidance every step of the way
Building Your First Underwater Rig with Ikelite: What You Actually Need
So you want to get into underwater photography, and you’ve landed on Ikelite gear. Solid choice. I’ve been shooting with Ikelite systems for years, from shallow reefs to deep wrecks, and I can tell you it’s one of the most reliable setups out there—but it can get overwhelming fast if you’re new. Here’s what you actually need (and what you don’t) to get started.
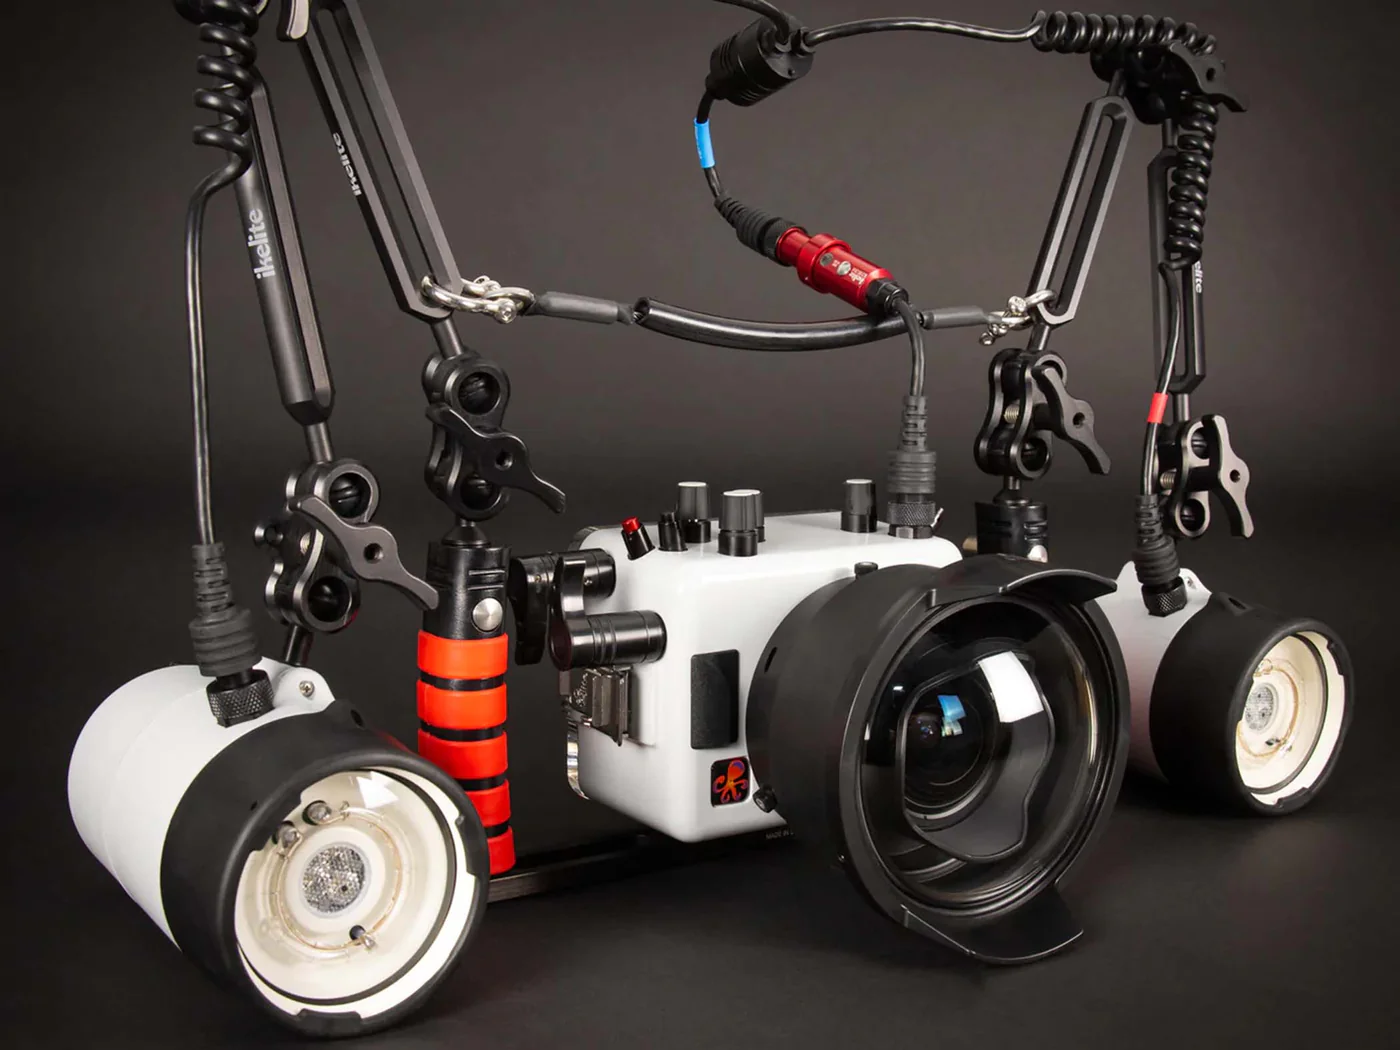
1. The Core: Camera + Housing
You obviously need a camera, but make sure it’s something that works well with Ikelite housings. Ikelite supports a large amount of DSLRs and mirrorless bodies, and their housings are purpose-built for each model.
-
Don’t cheap out on the housing. The Ikelite housing is your main line of defense against saltwater, sand, and pressure. Go for the 200DL or 200DLM series depending on your camera type. They’re built like tanks and easy to maintain.
Explore Ikelite housings to view the various options.
-
Be sure the housing has the proper port mount for your lens. This is a mistake a lot of people make—you can’t just shove any lens in there and expect results.
2. Lens Ports: Dome or Flat?
The port system is what seals the lens section. You need the right one for your specific lens.
-
Dome Port: Best for wide-angle lenses. Preserves the field of view and reduces distortion underwater.
-
Flat Port: Ideal for macro or standard lenses. Adds slight magnification, which is a plus for small subjects.
Check out our selection of Lens Ports
And please check the Ikelite port chart before buying. Trust me, ordering the wrong port is frustrating and expensive.
3. Strobes: Yes, You Need Light
Underwater, light disappears quickly—reds and yellows vanish within meters. A strobe (or two) brings the color back and makes your photos pop.
-
DS51 II or DS160 II: Both are excellent, the DS160 has a stronger output and better recycle time. You can start with one and add another later.
Don’t forget a sync cord or TTL converter if your housing supports TTL. Proper exposure is everything.
4. Arms, Clamps & Tray: The Framework
These are the unsung heroes. You’ll need a tray to mount the housing, arms to hold the strobes, and clamps to adjust positioning.
-
Start with dual arms if you plan on two strobes eventually.
-
Go for lightweight arms if you’re not diving with a heavy suit or want to keep the rig trim.
- Find Arms and Trays
5. Other Accessories (Optional but Useful)
-
Vacuum valve system: Great for peace of mind. Lets you check housing integrity before diving.
-
Color-correcting filters: Helpful for ambient light shooting, especially without strobes.
-
Spare O-rings, grease, silica packs: Don’t dive without backups.
-
Lanyard or handle: Makes carrying your rig easier and safer on boats.
Final Advice
-
Test your setup in a pool first. Always. You don’t want to find a leak at 30m.
-
Rinse thoroughly after every dive. Salt is the enemy. Even the best gear fails if it’s not maintained.
-
Don’t overcomplicate your first rig. You’ll learn what you need as you shoot. Start with the essentials and expand from there.
We hope this made building your first underwater rig a little less confusing. With Ikelite gear, you're getting rugged, reliable equipment built for real-world diving. Choose the right components from the start, and you’ll spend more time underwater capturing footage—and less time dealing with issues. Happy diving.